Wednesday, March 22, 2017

Choose a Sunny Location

There are four things to consider when choosing a garden spot to grow vegetables.  It needs to get full sun, drain well, be level or can be made to be level, and be near a water source. 


Because plants use energy from the sun to make fruit choose a garden spot that gets sun all day or at least 6 hours. 8 hours is even better.


I had planned to put the garden near the deck were the grass was sparse.  I didn't want to dig up the yard.  When I noticed that spot was the last place the snow melted, I realized it was shaded by the house.    
  

TIP: On a sunny day, use your phone and make a short video of your yard every hour or two. Note the time the sunlight first shines on potential garden spots and when it moves away from the area.  By the end of the day, you'll have found your perfect spot.  Vegetables need six full hours of sun but it can be collective, morning and afternoon sun.  Remember to account for nearby trees that will continue to grow and encroach on your garden light.


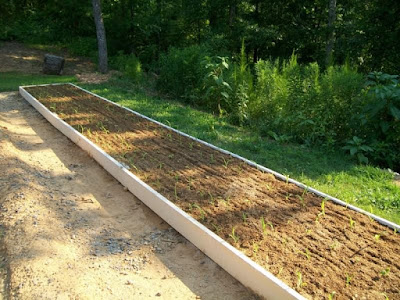
Our sunny spot was on the other side of the yard.  This spot drained well with no standing water.  The ground wasn't level but we were able to move dirt around and level the area.      


...and it was near a water source.


This is another idea for leveling a sunny spot is this garden by Steve and Beth Morril.     


The best garden spot may not be in the backyard like the grass by this sunny wall.  


This one step leading to our deck gets morning sun and afternoon sun, totaling more than six hours and the wicker basket drained well.  You may need to think outside the box to find a place to grow a garden. You are looking for four conditions;
  • sun all day or at least 6 hours 
  • well-drained soil without standing water 
  • level or could be made level 
  • close to a water source  
Take your time choosing a garden spot because these are the greatest factors in your garden doing well. 


  When you've found your garden spot, then it's time to choose a garden style or here to return.


Tuesday, March 21, 2017

Decide on a garden style

Once you've chosen a well drained spot with full sun, that is level or could be made level, and close to a water source you are ready to decide what kind of garden you'll make. There are several styles to choose from:

You could make a container garden.  Wicker is ideal because it drains well.


A garden in the ground is the fastest, cheapest and you could probably start it today.  The disadvantage is weeds grow on the ridges and they will need to be raked down and built back up. This is good for beans, squash, carrots, onions, broccoli, cabbage, lettuce and any vegetable that doesn't need support.  

In ground with a T-frame.  Notice how he cleared the whole area then pulled from the sides to pile up this ridges. T-frames are good for pole beans, tomatoes, and cucumbers. 


Or you could do a combination of both like in Bobbie Willingham's garden.  She planted according to height, short to tall.  The tall tomatoes and pole beans are on the northeast side so the warm afternoon sun can shine on everything. 


Well almost everything, the okra by the fence on the far right didn't grow as fast as the beans, oops.

If you have poor soil like this yard, vegetables will grow in it but it's a pain to dig in!  A garden box would be more enjoyable. Can you see how the dirt forms a box to whole the water near the plants? 


A garden box with a small T-Frame on the back and a row on the front is also a good option. This is a side view of our garden  The T-Frames in the back support tomatoes, cucumbers, cantaloupe and pole beans.  The front of the box is squash, bush beans, onions, squash, lettuce, and carrots. The advantage to a garden box is less weeds and a more defined space.  The disadvantage is the cost of materials and the time to build it.  The box can be filled with free material like leaf mulch or sawdust from a cabinet shop.  A few bags of purchased concrete sand is a nice addition.    

This is a double box without a T-frame.  He has five rows of corn growing in this box. 


This is Jim and Araksya Kennard's home.  This garden box has tomatoes, cucumbers and honey dew melon hanging.  He used a double T-Frame that is 6' wide at the top.  Jim is the one that brought Mittleider Gardening to Alabama.  These T-frames were donated and relocated to a girl's camp.  Click here to see pictures of the project.


Another option for a garden box is to not use purchased wood.  Teresa and Cris Partain's garden box is made from tree trunks.  They planted in leaf mulch and sand.


They even used logs for the wood at the top.

These tall trees fell during an ice storm just as they were about to buy the wood their garden box.  Remember, the point is to keep the grass and weeds out and the water in.  A variety of materials can be used.  Use thee resources you have? 


To help you choose between planting in the ground or making a box or simply planting in containers, consider what your family will eat and what you could grow. If everything you want to plant is short, then there is no need for T-Frames.  Here is a list of vegetables that don't need T-frames.  
Bush beans, beets, broccoli, cabbage, carrots, cauliflower, celery, Swiss chard, corn, eggplant, kale, lettuce, okra, green onions, bulb onions, parsley, all types of peppers, red potatoes, sweet potatoes, radishes, all types of squash, spinach, turnips, and watermelon.  


Small melons, pole beans, tomatoes, peas, and cucumbers work best on T-Frames.  

If you've found a good spot for your garden and have decided what type you want -- then it's time to start digging or click here to return!

Monday, March 20, 2017

Constructing Your Garden

Regardless of which garden type you choose, the first step is to remove the weeds and grass.  This will be more important mid-summer when it gets hot and the ones that don't get removed keep growing.


This can be done with a shovel or a tiller. 


I removed all this grass with a shovel.  I wish I would have removed all the grass in and around this box before putting the wood in place.  Eight years later and one corner still has grass trying to grow under the edges of my box.   

With a tiller, till down only about 2 inches.  then with a metal rake, rake the grass and weeds away.  Then till again about 8-10 inches to have dirt to shape the beds.


Can you see how he used a rake to pull dirt from the isle? 


I'm sure at this point you would love a video.  This is a video of Jim Kennard demonstrating how to make a garden in the ground. This is a handout that shows the layout of the garden beds.  

This video show how to make the garden boxes.  After 10 years of Mittleider gardening an 18" wide box is my favorite size.  One long box can be watered with just one timer.  This narrow box is also easier to tend.  


Consider getting this book if you plan to make a Mittleider Garden.  It has much more details than I've included here. The Mittleider Garden Course 

Once you've constructed your garden, then it's time to plan to plant or here to return.


Sunday, March 19, 2017

Planning to Plant

Here is a copy of the plot plan for the Hulaco garden


The plot plan for my garden is also in that file.  Just to give you an idea of how much can fit in a small space.  


This was my garden from a couple of years ago.  The poor onions in the front didn't stand a chance with the squash stealing all the sunlight.

I like to plan my garden in an Excel spreadsheet.  It's like graph paper but I can drag things around without a lot of erasing.  One square represents one foot.  Take a close look at this Planning Details Chart.  In the fifth column it shows how far apart the plants need to be spaced.  That will help you know how many plants or seed will fit within one foot of garden.  

Timing and temperature are important. This next chart shows the planting zones in the United States.  Once you know which zone you are in, do a Google search and find out what the Average Date of the Last Frost is. (ADLF)     


Once you know the Average Date of the Last Frost in the Spring for your area then count forward and backward to find the date for all the vegetables you plan to grow.  Stay true to these dates.  Plants grown out of season, will be stressed and will likely not produce well and are more prone to get bugs.  


Here are some charts to help explain the details of laying out your garden.


Next How to shop for seeds and plants or go back to the beginning.  


Friday, March 17, 2017

How and When to Water


Most people only water their garden to keep it alive.  But there is a better reason to water.  


 Pest control.  Healthy, watered plants rarely get bugs! 


A water hose can be used.  Just tie an old rag around the end of the hose and lay it in the garden.  The rag helps hold the hose in place and disperses the water.  That way the water can be turned on full blast and not make a hole in the garden.  If the garden bed is level or about 1" lower on the far end, the water will easily flow to the end of the row.  The goal is to flood the area around the plants and then turn the water off and let it seep in.  It should still only take about 3-5 minutes depending on the length of the row and how high the water pressure is. If it rains so much that water is standing in the bed, take a shovel and cut a slit in one end so the extra water can drain out.
This garden gets watered with PVC pipes that have 3 holes on the underside and the pipe is attached to a water hose.  Again the goal is to not water right at each plant but to flood the area around the plant.  This is an open bottomed box so it if the box gets too much water it will run out the bottom. 


This is the underside of the pipe.  It is drilled with a 57 bit, for tiny, pin-sized holes.   


It is not necessary, just easier, to water when the pipes are connected with PVC and the hose can stay connected.
For best water pressure, we only water one row at a time.  There is a valve that can open and close on each row. The snap connection makes it easy to unhook the hose when the grass gets mowed. 


If you have more than one box you may want to connect them underground so it's easier to walk around the boxes. 


Besides being pesticide-free, another added bonus to consistent watering is full juicy, fruit.  Perfect for snacking on while working outside. 

Here is a link to LDSPrepper, installing his PVC Watering System. At time code 3:27 he shows how he drilled the pipes.


Once you've figured out how to water your garden it's time to shop for plants  or here to return.

Wednesday, March 15, 2017

Transplant Fertilizer - Ammonium Nitrate

Sprinkle Ammonium Nitrate down the middle of each row as soon as transplants are planted. Only for transplants not for seeds.  This will help the plants make the overcome the shock of being transplanted.

Ammonium Nitrate (20-0-0)

1/3 cup for 10 foot row
2/3 cup for 20 foot row
1 cup for 30 foot row

Tuesday, March 14, 2017

Pre-Plant Fertilizer

Pre-Plant Fertilizer             
10 cups (5 lbs) lime
2 level tablespoons borox (20 Mule Team Borax laundry detergent)
1/2 cup Epsom salt (in the Pharmacy department)


Mix together and store in a container with a tight lid.

To apply: sprinkle 1 ounce per linear foot
TIP: If your garden is 16 inches long, find a can of vegetables that's 16 oz. and use it to measure the fertilizer.

Rows are 18 inches wide.  How much fertilizer is determined by how many feet long the row is.

Mix the fertilizer into the soil each time a new crop is planted.  (If you have a Spring and Fall crop in one year - apply in the Spring and again in the Fall before planting.)


Reapply this if you see any signs of bloom end rot.  Bloom end rot is actually a calcium deficiency.  This fertilizer will supply the needed calcium.  Where I live we receive 56 inches of rain each year.  That much rain washes the calcium out of the soil.  I reapply this once a month to prevent bloom end rot.
To apply: sprinkle 1 ounce per linear foot 
When reapplying, the fertilizer doesn't need to be worked into the soil.  Sprinkle it about 6 inches from the plants and where the water will run over it each time the garden gets watered.    

You only need a little of this in the fertilizer but keep it handy, it is great for killing ants in the garden.  Just sprinkle it on the mound and leave it.


Monday, March 13, 2017

Weekly-Feed Fertilizer

Most soils are lacking in vital nutrients.  It's complicated to get a soil test and then know what to do with it once you get it.  It's easier to give the soil everything the plants need in measured amounts over the growing season.  This has been proven to replace what the plants take out of the soil so there is no need to rotate crops.  That's good news for most home gardeners.  This recipe is better, but comparable to MiracleGro but much cheaper per application.    


Weekly feed Fertilizer 

25 pounds 13-13-13 Fertilizer (Buy 50 pounds and use half)
4 pounds Epson Salt
10 oz. packet Mittleider Magic Micro-Mix
5 cups powdered lime 

Mix in a wheel barrel, tossing together with a shovel.  Shovel into a 5-gallon bucket with tight fitting, screw off lid.  Store in a cool place.

For the garden:
Once a week sprinkle 1/2 ounce per foot which works out to be:
10 foot row (5 oz.)
20 foot row (10 oz.)
30 foot row (15 ounces)*

Sprinkle the fertilizer on the soil where the water can wash over it and carry it to the plants.  Keep the fertilizer about 4 inches away from the plants. 

*Tip: If your garden rows are 30 feet long, divide that number in half (15).  Then look in your pantry for a can of veggies that's 15 oz. and have that for lunch.  Wash the can and dry it good and put it with your fertilizer.  Then just sprinkle one can of fertilizer down each row.

For transplants begin fertilizing the day you plant or within three days.  
TIP: Have your first application be the most convenient day to fertilize all summer.  Continue until the plants are nearing the end of their growing season.  Don't fertilize seeds until they are a couple of inches tall and have several leaves.  Then begin feeding them once a week.

$$ Just a note $$
In 2014 I did the math for the fertilizer as it applies to fertilizing tomato plants.  It works out to be about .20 cents a plant for the ENTIRE summer.  Considering each plant has the potential to produce about 20-35 tomatoes (35 in Alabama!) Each of my tomato plants, if pruned, watered and fertilized, can produce about $50.00 worth of tomatoes!  The fertilizer is a good value.  This fertilizer is better, but comparable to MircleGro but cheaper per application.  *This recipe makes 50 cups.
Using the whole bag and both packs of Micro Nutrients (Micro-Mix comes in a pack of 2) will make just a little over 100 cups.

Notice that plants in the garden do not all get fertilized the same number of applications.  Tomatoes get the most applications of fertilizer.
If you have bedding plants that can't be planted in the garden right away, dissolve 2 tsp Weekly Feed in 1 gallon water. Use each time you water.  This is called Constant Feed solution.

"The Constant Feed (liquid) solution is NOT for feeding potted plants and trees. It would be stronger than needed if used each time you water. We recommend you apply the fertilizer dry at the rate of 1 ounce of Pre-plant and ½ ounce of Weekly Feed per cubic foot of soil in your pots, and water it in. The Pre-Plant is applied only one time per year, and the Weekly Feed is applied three times..." Jim Kennard at https://www.facebook.com/groups/MittleiderGardening/222455361219630/


Sunday, March 12, 2017

Growing Vertically


Start with Healthy Plants


Each spot in the garden has the potential to grow a lot of food so we don't want any bare spots and we don't want to waste space that we are watering and fertilizing. We want a healthy plant in every spot and as close together as possible. When choosing plants it's okay if they have blooms but they shouldn't have fruit. A plant that has fruit at the store has probably been under stress. When plants are stressed they tend to just want to do what they came to do and get it over with and that will often make them bear prematurely. A garden is so much more enjoyable if all the plants are healthy. If you have a plant that is “just hanging on”, pull it up and replace it with something healthy. It will only bring bugs and bring the whole garden down. I keep extra seeds so if one of my seeds doesn't sprout then I can sow another one. 


 Here is a chart to show how close the seeds need to be planted using the Mittleider Method. This will differ from what is on the back of a pack of seeds or what it says on the little tag that comes with the plants. Using this method we can fit in a lot more plants which will give us more food from our garden.
Pruning Away the Unhealthy

Pruning, along with watering is a great way to minimize the number of bugs that get on our plants. We prune off any leaves that are unhealthy and any leaves that touch the ground. Plants naturally start to get brown leaves beginning at the bottom of the plant. We simply take our scissors and cut those off and discard them. The lower leaves are often where the bugs and diseases get onto the plants. By removing the lower leaves we are often physically removing the bugs at the same time. We will continue to prune off the lower dying leaves through out the growing season. It's funny how a garden grows. We wait and watch for the plants to get full grown and begin to bare. Then we can enjoy about a week of a lush and green and amazing garden. Then, the very next week, leaves start to turn brown and it just spoils the effect. Another added bonus to pruning away all the dead and dying leaves is, we can have that 'pristine' look all season. By just giving our plants a little 'trim around the ears', we can have lush and green and amazing, all summer long.
Before pruning

After pruning
Prune Away Some of the Good Leaves.

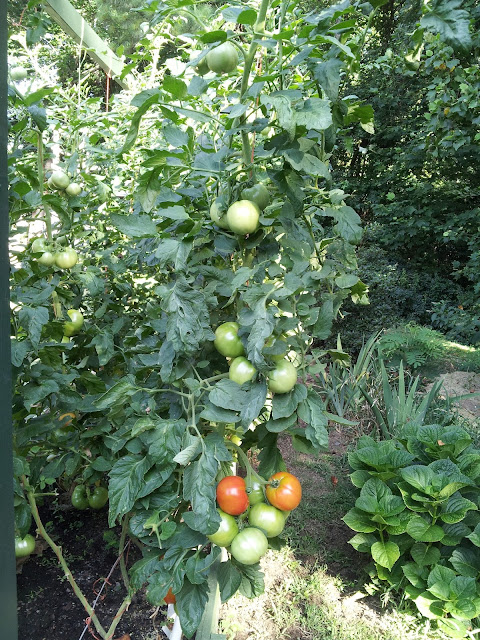
The leaves are essential but they can also be a burden for the plant. Many plants have 'suckers' that will create additional branches of the plant.  Tomatoes, melons, and cucumbers, all have suckers. 
 
Notice this tomato plant has one main stem.
It has branches with leaves
Notice how the top of the plant has a 'rooster top' or 'crown'.  Sucker will have that 'crown' as well.  Can you see the sucker just to the right of the main top of the plant?  


Interestingly it has a little plume or 'rooster crown' on the top of it, as well. That is because, it is actually, another whole tomato plant. That is why we call them suckers. In fact if we removed this sucker and took it to the kitchen and put it in water, in about a week it would root and we would have another whole tomato plant!  Near every branch of leaves on this tomato plant a sucker will grow. Amazingly, if we left those little suckers growing, they would get suckers themselves and branches. If each tomato plant had 12 suckers, (which is certainly the case) and then each of those suckers all had 12 suckers, in a very short time our 1 plant would have 144 suckers! I often hear people say, “I have a lot of tomato plant but I don't have any tomatoes.” All of the plants energy is going to support the plant and it doesn't have any energy left to make fruit.  If you look at the stalk coming out of the ground it is like a straw in which the plant gets all his water and nutrition.  Having 144 suckers is like 145 people all trying to drink from one straw at once. 
 
It would be much easier if each plant had its own straw. So because our goal is a lot of fruit and not a lot of plant, we will remove all the suckers and just be left with one main stalk with branches and leaves.


We are also going to remove all the fruit, good or bad, just as soon as we can, so then the plant can use all its energy to make new fruit. In fact, I usually pick my tomatoes just as they are beginning to get a little 'sunset' color to them and all my produce, when it is just big enough, so I very seldom ever lose any fruit to bugs.
Same tomatoes 3 days later.  I just leave them on the counter.  They don't need sun or any other help.  Just a couple of days.


Lastly we will prune away the weeds. Weeds are another way bugs get into the garden. Because the weeds are a good place for bugs to live they make a perfect springboard for the bugs to jump from the weeds into the garden. Weeding is the #1 reason for making a raised bed instead of a ground bed. Weeding is much easier in a box. We also want to keep the isles weed free so nothing can grow into our box. This keeps the bugs very far away from our vegetables. 
 
Growing on strings.
Here, I think a picture is worth a thousand words. 


Honey Due Melon on a string

Tomatoes and melons on a string

There is a wire that attaches to the T-Frame and run the distance of the row to the other T-Frame

A string is attached to the wire. One string for each plant.

Then the string is tied to the wood that runs between the T-Frames.  This open loop knot (sorry I don't know what it's called) makes it very easy to untie the string and tie it back. It's like tying your shoes but not pulling the second loop all the way through.  

The string is not taunt, there is slack in the string so the plants will lean.  This slack will make it possible to wrap the string around the plant (not the plant around the string)


Start when the plant is just big enough to want to tip over.  (Much smaller than the one in this picture). Then gently wrap the string around the plant.  Use the limb of the plant to help hold the string in place.  This plant will just lean on the string and keep from falling over.
Because tomatoes grow from the top, we will just wrap the string around again as the plant gets taller.

The tomatoes alternate.  The first to the right the second to the left and so on. The tomatoes are 9 inches apart planted in a straight row.  But because we alternate the direction of the strings (one to the left and the next tot he right).  The tomatoes are 18 inches apart at the top.  This is Jim Kennard's garden!

That means that in a 30 foot box like this one, using the traditional method, we would only be able to fit in 20 tomatoes, but pruning and using string for support we can fit in 80 tomato plants! That's 4 times more plants will equal a lot more tomatoes! 
It easy to see, that if our tomatoes have a straw in the ground every 9 inches, they will be able to absorb 4 times more water and nutrients than before! The natural result is, more fruit!
 
Fertilizer
We fertilized this garden with a homemade pre-plant fertilizer before we planted and then we use a weekly feed, once a week. Now if you are like I was the first time I heard about all this, you might be thinking, “I'm not sure my tomatoes need to eat that well.” Before you dismiss the idea of fertilizer, let me run the numbers for you. It cost about .22 cents to fertilize one tomato plant all season long. You can buy a tomato plant for about .40 cents. Last summer in my garden, my tomato plants produced about 35 tomatoes each, over the season. That makes each plant worth about 50.00 
This is a picture of my counter. This is after I gave away at least that much.  I have 25 plants and it has looked like that most of summer. I pick about 60 tomatoes a week, not counting the cherry tomatoes of which I have plenty.  We have tomatoes for breakfast, lunch and dinner...as it should be.

Plenty of sun, consistent water captured near the roots,  starting with healthy plants, pruning, using strings for support, and nourished regularly.  This is a recipe for a very rewarding garden.  This was only a brief overview.  If you think you're ready to start digging up the yard you might want to get all the facts and details.  The is the book I used The Mittleider Gardening Course    (also available for download) or you can Watch it Done in a YouTube video  Happy gardening!